
How to Check Car Fluids Quickly and Accurately at Home
how to check car fluids
Maintaining your vehicle requires regular attention under the hood. Learning how to check car fluids ensures your engine runs smoothly while preventing costly mechanical failures. By performing these simple inspections yourself, you gain confidence in your automobile’s health and longevity.
This guide covers essential components including engine oil, coolant, brake reservoirs, and transmission systems. Consistency is vital for reliable results. Always utilize clean tools and follow manufacturer specifications found in your owner’s manual.
Safety remains the top priority during every inspection. Ensure the engine reaches the correct temperature before starting, as some levels require a warm motor while others demand a cold state. Careful observation of color and consistency helps identify potential issues before they escalate into major repairs.
Key Takeaways
- Regular maintenance prevents expensive engine damage.
- Always consult your owner’s manual for specific manufacturer requirements.
- Use clean equipment to avoid contaminating sensitive internal systems.
- Monitor both temperature and volume for accurate readings.
- Visual inspections of color and texture reveal hidden mechanical problems.
Set Up a Safe, Accurate Fluid-Checking Routine
Learning how to check car fluids begins with creating a controlled environment for your inspection. By establishing a consistent routine, you ensure that every measurement is reliable and that your vehicle remains in peak condition.
Park on level ground and let the vehicle reach the correct temperature
Always park your vehicle on a flat, level surface before beginning. An uneven surface can cause fluids to pool incorrectly, leading to misleading readings on your dipsticks or reservoirs.
Furthermore, pay close attention to the engine temperature. Some systems require a warm engine to expand the fluid to its operating volume, while others must be checked cold to prevent pressure-related injuries.
Gather gloves, shop towels, a flashlight, a funnel, and the owner’s manual
Preparation is key when you learn how to check car fluids. Keep a pair of nitrile gloves to protect your skin from harsh chemicals and a stack of clean shop towels to wipe dipsticks and clean up minor drips.
A bright flashlight helps you see into dark engine bays, while a clean funnel prevents spills when topping off. Always keep your owner’s manual nearby to verify the specific fluid types and capacity requirements for your model.
Identify fluid reservoirs, dipsticks, warning labels, and fill points
Take a moment to map out your engine bay before you start. Locate the primary reservoirs for oil, coolant, brake fluid, and transmission fluid.
Look for clear markings or colored caps that indicate the fill points. If you are unsure about a specific component, consult the diagrams in your manual to avoid adding the wrong fluid to the wrong reservoir.
Prevent burns, chemical exposure, spills, and accidental vehicle movement
Safety must remain your top priority during every inspection. Never open a pressurized system, such as a hot radiator, as this can cause severe steam burns.
Work in a well-ventilated area to avoid inhaling fumes and keep a spill kit or rags ready to contain any accidental leaks. Always ensure the parking brake is fully engaged to prevent the vehicle from rolling.
When to use wheel chocks, a cold engine, or professional assistance
If you are working on an incline, use wheel chocks to secure the vehicle firmly. If you notice signs of a major leak, excessive smoke, or if you feel uncomfortable performing the task, seek professional assistance immediately.
Some modern vehicles feature sealed systems that require specialized tools for accurate assessment. In these cases, it is safer to let a certified technician handle the maintenance to avoid damaging sensitive components.
How to check car fluids with the correct inspection sequence
Mastering the process of how to check car fluids requires a disciplined and repeatable approach. By following a set path, you ensure that no critical reservoir is overlooked during your routine maintenance.
Follow a repeatable walk-around from the engine bay to the vehicle exterior
Start your inspection at the front of the engine bay and move in a clockwise direction. This systematic flow helps you identify every fill point and dipstick without confusion. Once the engine bay is complete, move to the exterior to check items like windshield washer fluid or tire-related systems if applicable.
Compare fluid levels with the MIN, MAX, FULL, or ADD markings
Every reservoir features specific indicators to guide your assessment. You must verify that the fluid level sits between the MIN and MAX lines or reaches the FULL indicator. If a dipstick shows an ADD mark, it serves as a clear signal that your system requires a top-off to maintain optimal pressure and cooling.
Evaluate color, smell, texture, and visible contamination without touching fluids unnecessarily
Visual inspection is your first line of defense against mechanical wear. Look for signs of discoloration, such as dark, burnt-smelling oil or milky coolant, which often indicates internal contamination. Avoid direct skin contact with these chemicals, as they can be hazardous to your health.
Record low levels, unusual changes, and the date of each inspection
Keeping a detailed log is essential for long-term vehicle health. Note the date and the specific levels you observed during each session. This history allows you to spot gradual leaks or performance trends that might otherwise go unnoticed until a breakdown occurs.
| Fluid Type | Ideal Level | Warning Sign | Action Required |
|---|---|---|---|
| Engine Oil | Between Min/Max | Dark or Gritty | Change or Top-off |
| Coolant | At Cold Fill Line | Rust or Debris | Flush System |
| Brake Fluid | Near Max Line | Dark/Cloudy | Inspect Pads |
Why the owner’s manual overrides general fluid-checking advice
While general tips on how to check car fluids are helpful, your vehicle’s owner’s manual remains the ultimate authority. Manufacturers provide specific procedures for temperature, engine state, and fluid types that are unique to your model. Always prioritize these instructions to avoid damaging sensitive components or voiding your warranty.
Check Engine Oil Quickly and Read the Dipstick Correctly
When you learn how to check car fluids, starting with the engine oil provides the best insight into your vehicle’s overall health. Regular inspections ensure that your engine remains lubricated and protected against friction-related damage.
Warm the engine, shut it off, and wait for oil to drain into the pan
Begin by running your engine for a few minutes to reach operating temperature. Once warm, turn the ignition off and allow the vehicle to sit for several minutes. This waiting period ensures the oil drains back into the oil pan for an accurate reading.
Remove, wipe, reinsert, and reread the dipstick for an accurate level
Locate the dipstick, pull it out, and wipe it clean with a lint-free shop towel. Reinsert the stick fully into the tube, then pull it out again to check the oil level. This process removes residual oil that could provide a false reading.
Interpret oil between the low and full marks without overfilling
Most dipsticks feature clear markings for “MIN” and “MAX” or “FULL.” Your oil level should sit comfortably between these two points. Avoid overfilling, as excess oil can cause foaming and damage internal engine seals.
Recognize dark oil, milky oil, metallic particles, fuel smell, and sludge
The appearance of your oil tells a story about your engine’s condition. Use the following table to identify potential issues during your inspection:
| Oil Appearance | Potential Meaning | Recommended Action |
|---|---|---|
| Dark/Black | Normal aging or high mileage | Schedule an oil change |
| Milky/Frothy | Coolant contamination | Seek professional repair |
| Metallic Flakes | Internal engine wear | Immediate inspection |
| Fuel Smell | Leaking injectors or rings | Consult a mechanic |
Add the manufacturer-specified oil in small amounts using a clean funnel
If the level is low, add oil in small increments using a clean funnel to prevent spills. Always use the exact viscosity and specification recommended in your owner’s manual. Recheck the level after adding to ensure you do not exceed the maximum mark.
How to check for leaks around the filter, drain plug, valve cover, and oil pan
Visually inspect the underside of your engine for signs of fresh oil. Check the oil filter, the drain plug, and the valve cover gaskets for wetness or drips. Persistent spots on your driveway often indicate a failing seal that requires attention.
When low oil pressure or repeated oil loss requires immediate service
If your dashboard displays a low oil pressure warning, stop the vehicle immediately to prevent catastrophic engine failure. Repeated oil loss that requires frequent topping off suggests a significant leak or internal consumption. In these cases, professional diagnostic service is necessary to maintain your vehicle’s safety.
Inspect Engine Coolant Safely and Accurately
Learning how to check car fluids properly starts with understanding your engine’s cooling system. Maintaining the right balance of coolant ensures your engine operates within a safe temperature range, preventing costly damage over time.
Check the coolant reservoir only when the engine is completely cool
You must never attempt to inspect the coolant level while the engine is hot. The cooling system remains under high pressure during operation, and opening it prematurely can lead to dangerous situations. Always wait for the engine to cool down completely before removing any caps.
Read the level against the cold fill line on the expansion tank
Locate the translucent plastic expansion tank near the radiator. Most vehicles feature clear markings on the side of this tank labeled “MIN” and “MAX” or “COLD FILL.” Ensure the fluid level sits between these indicators while the engine is cold to guarantee an accurate reading.
Distinguish normal coolant color from rust, oil contamination, and floating debris
Healthy coolant typically appears bright green, orange, pink, or blue, depending on the manufacturer’s specification. If you notice a murky brown color, oily film, or floating particles, your system may have internal contamination. These signs often suggest that a professional flush or repair is necessary.
Use the correct coolant type and a premixed or properly diluted solution
Always consult your owner’s manual to identify the specific coolant chemistry required for your vehicle. Mixing incompatible types can cause chemical reactions that damage your cooling system. Using a pre-diluted solution is often the safest way to ensure the correct water-to-antifreeze ratio.
Inspect hoses, the radiator area, the reservoir, and the ground for leaks
Take a moment to scan the rubber hoses for cracks, bulges, or soft spots. Check the area directly under your vehicle for puddles, as this is a common sign of a cooling system leak. Catching these issues early is a key part of knowing how to check car fluids effectively.
Why opening a hot radiator cap can cause severe burns
Opening a pressurized radiator cap while the engine is hot releases superheated steam and boiling liquid instantly. This sudden pressure drop causes the coolant to flash-boil, which can spray outward with significant force. Severe, life-altering burns are a very real risk if you ignore this safety warning.
What an empty reservoir, overheating gauge, or sweet coolant odor may indicate
An empty reservoir often points to a significant leak or a failing water pump. If your dashboard temperature gauge climbs into the red zone, pull over immediately to prevent engine seizure. Additionally, a distinct, sweet smell inside or outside the cabin frequently signals a coolant leak that requires urgent attention.
Verify Brake Fluid Level and Identify Brake-System Warnings
When you learn how to check car fluids, the brake system requires a unique and cautious approach. Unlike other reservoirs, the brake system is a sealed environment that demands high levels of cleanliness to function correctly.
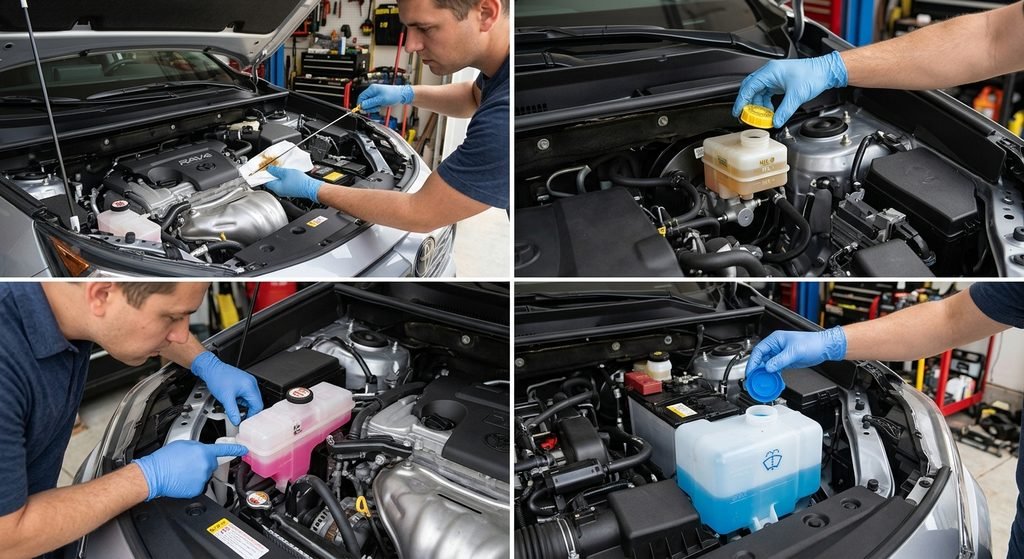
Locate the brake fluid reservoir near the master cylinder
You will typically find the brake fluid reservoir mounted on the driver’s side of the engine bay, attached directly to the master cylinder. It is usually a translucent plastic container that allows you to see the fluid level without removing the cap.
Check the level without opening the reservoir unless the manual requires it
It is best practice to inspect the fluid level through the side of the reservoir. Opening the cap introduces moisture from the air, which can degrade the fluid’s performance. Only remove the cap if your owner’s manual specifically instructs you to do so for a physical measurement.
Assess fluid color and look for moisture, sediment, or a damaged cap seal
Fresh brake fluid is typically clear or light yellow. If you notice the fluid has turned dark brown or black, it may be contaminated with moisture or debris. Always inspect the cap seal for cracks, as a damaged seal allows contaminants to enter the system.
Connect a low fluid level with possible pad wear or a hydraulic leak
A drop in fluid level often indicates that your brake pads have worn down, causing the pistons to extend further and pull more fluid into the lines. However, it can also signal a dangerous hydraulic leak. If the level is consistently low, have a professional inspect the lines and calipers immediately.
Never substitute power steering fluid, transmission fluid, or another product for brake fluid
Using the wrong fluid type can cause catastrophic seal failure and total brake loss. Always use the specific DOT rating recommended by your vehicle manufacturer. Never mix different types of brake fluid, as this can lead to chemical reactions that damage your braking components.
“The safety of your vehicle relies on the integrity of your braking system; never ignore the warning signs of fluid degradation or loss.”
When a soft pedal, illuminated brake warning light, or visible leak makes driving unsafe
If you experience a “spongy” or soft brake pedal, it is a clear sign of air or moisture in the lines. When the dashboard brake warning light illuminates, or you spot fluid pooling under the vehicle, you must stop driving immediately. These symptoms indicate that your vehicle is no longer safe to operate on public roads.
Measure Automatic Transmission Fluid According to Manufacturer Instructions
Understanding how to check car fluids is essential for the longevity of your vehicle, especially when it comes to the transmission. Unlike engine oil, transmission fluid requirements vary significantly between different makes and models.
Determine whether the vehicle has a transmission dipstick or a sealed system
First, consult your owner’s manual to identify your specific setup. Many older vehicles feature a dedicated dipstick, while modern designs often utilize a sealed system that lacks a traditional dipstick for owner access.
Follow the required temperature, engine-running, gear-selection, and parking procedure
If your vehicle has a dipstick, the engine must usually be at operating temperature and running in “Park” or “Neutral.” Some manufacturers require you to cycle through all gears before checking the level to ensure the fluid has circulated through the valve body.
Read the dipstick consistently and avoid confusing transmission fluid with engine oil
Always wipe the dipstick clean with a lint-free cloth before reinserting it for an accurate reading. Be careful not to confuse the transmission dipstick with the engine oil dipstick, as they are often located near each other in the engine bay.
Evaluate fluid color, burnt odor, foam, and metal particles
Healthy transmission fluid is typically bright red or pink and translucent. If you notice a burnt odor, dark brown color, or visible metal shavings, your transmission may be experiencing internal wear.
Add only the exact fluid specification in small measured amounts
If the level is low, add fluid in very small increments using a clean funnel. Using the exact manufacturer-specified fluid is critical, as using the wrong type can cause immediate damage to the internal components.
Why sealed transmissions should not be opened or topped off casually
Sealed transmissions are designed to be maintenance-free for long intervals. Opening these systems without the proper diagnostic tools can introduce contaminants or lead to incorrect fluid levels, which often results in catastrophic failure.
How delayed shifting, slipping, grinding, or fluid leaks change the inspection decision
If you experience delayed shifting, slipping gears, or grinding noises, your transmission requires professional attention immediately. These symptoms, combined with visible fluid leaks under the vehicle, indicate that simply checking the level is no longer sufficient to ensure safe operation.
Check Washer Fluid, Power Steering Fluid, and Other Service Fluids
When you learn how to check car fluids, it is important not to overlook the secondary reservoirs that support steering, visibility, and transmission functions. These components are essential for safety and comfort, yet they are often ignored during routine maintenance.
Fill windshield washer fluid without using water or engine coolant
Windshield washer fluid is vital for maintaining clear visibility in all weather conditions. Always use a dedicated automotive washer solvent rather than plain water, which can freeze or harbor bacteria. Never mistake the washer reservoir for the engine coolant tank, as these fluids serve entirely different purposes and are not interchangeable.
Inspect power steering fluid only when the vehicle is equipped with hydraulic steering
If your vehicle uses a traditional hydraulic steering system, you must monitor the fluid level to ensure smooth operation. You can determine if your car has this system by checking the owner’s manual or looking for a reservoir near the engine belts. If you are unsure how to check car fluids of this type, consult your service guide to locate the specific cap.
Compare power steering fluid with the hot or cold markings specified by the manual
Most hydraulic reservoirs feature specific markings to indicate the correct level based on temperature. Always check the fluid when the engine is at the temperature specified by the manufacturer. Overfilling or underfilling this reservoir can lead to pump damage or stiff steering performance.
Recognize that many newer vehicles use electric power steering with no reservoir
It is important to note that many modern vehicles have transitioned to electric power steering (EPS). These systems do not use fluid and therefore have no reservoir to inspect. If you cannot find a power steering cap, your vehicle likely utilizes an electric motor to assist with steering maneuvers.
Check clutch hydraulic fluid and diesel exhaust fluid when the vehicle requires them
Vehicles with manual transmissions often use a shared or separate reservoir for clutch hydraulic fluid. Additionally, modern diesel engines require periodic refills of Diesel Exhaust Fluid (DEF) to meet emissions standards. Always verify the specific requirements for your vehicle model to ensure you are using the correct product.
Keep incompatible fluids out of shared-looking reservoirs
Always double-check the cap labels before adding any liquid to your vehicle. Mixing incompatible fluids can cause severe damage to seals, pumps, and internal components. When you master how to check car fluids, you protect your vehicle from costly and preventable mechanical failures.
Confirm Findings, Top Off Fluids, and Avoid Common Mistakes
Mastering the art of how to check car fluids involves knowing exactly how to conclude the process safely. Once you have completed your initial inspection, you must ensure that every component is returned to its proper state to maintain vehicle integrity.
Recheck a questionable reading before adding fluid
If a dipstick or reservoir level appears unusually low, do not rush to add fluid immediately. Always perform a second check to confirm the reading, as uneven ground or engine temperature can often lead to false results.
Top off gradually and stop below the maximum mark
When you determine that a top-off is necessary, add the fluid in small, measured increments. It is vital to stop below the maximum mark to prevent overfilling, which can cause pressure buildup and potential seal damage.
Clean caps and dipsticks before reinstalling them securely
Before you close the hood, wipe down all caps and dipsticks with a clean, lint-free shop towel. This simple step prevents dirt and debris from entering your sensitive engine systems, which is a critical part of how to check car fluids correctly.
Inspect for leaks after starting the engine and moving the vehicle
After you have secured all caps, start the engine and let it idle for a few minutes. Carefully observe the ground beneath the vehicle for any fresh drips or puddles that might indicate a loose connection or a failed seal.
Avoid mixing incompatible specifications, using dirty containers, or relying on fluid color alone
Never mix different types of fluids, such as different coolant formulas or oil weights, as this can lead to chemical reactions. Furthermore, never rely solely on color to judge fluid health, as some fluids change appearance naturally over time without losing their effectiveness.
How to dispose of used oil, coolant, brake fluid, and contaminated towels responsibly
Used automotive fluids are hazardous waste and must be handled with care. Take your old oil and coolant to a local recycling center or an auto parts store that accepts these materials. Never pour chemicals down the drain or onto the ground, and store contaminated towels in a sealed container until they can be disposed of at a hazardous waste facility.
When a fluid check should become a repair appointment instead of a do-it-yourself task
While learning how to check car fluids is a great skill, some signs require professional attention. If you notice persistent leaks, metallic shavings in your oil, or a burnt smell coming from the transmission, schedule a service appointment immediately. These symptoms often point to underlying mechanical issues that go beyond simple maintenance.
Use a Maintenance Log to Turn Fluid Checks Into Preventive Care
You can easily turn the process of how to check car fluids into a powerful preventive care strategy by keeping a simple log. A written record acts as a diagnostic tool, allowing you to spot subtle trends that might otherwise go unnoticed until a major failure occurs.
Record fluid levels, appearance, mileage, and top-off amounts
Consistency is the foundation of effective vehicle maintenance. By noting the date, current mileage, and the specific fluid levels, you create a baseline for your car’s performance. Small, gradual changes in color or volume often serve as the first warning signs of internal wear or minor leaks.
“An ounce of prevention is worth a pound of cure, especially when it comes to the complex systems under your hood.”
Pair fluid inspections with oil changes, tire checks, and scheduled maintenance
Integrate your fluid inspections into your existing service routine to ensure nothing is overlooked. When you are already checking tire pressure or preparing for an oil change, take a few extra minutes to verify all reservoirs. This holistic approach keeps your vehicle in peak condition and simplifies your overall maintenance schedule.
Use dashboard warning lights and vehicle symptoms as supporting evidence
Your car often communicates its needs through more than just dipsticks and reservoirs. If a dashboard light flickers or you notice unusual engine noises, cross-reference these symptoms with your maintenance log. This data helps you determine if a low fluid level is the root cause or merely a symptom of a larger mechanical issue.
Set a practical inspection schedule based on driving conditions and vehicle age
Not every vehicle requires the same level of attention. Older cars or those subjected to harsh environments need more frequent monitoring to prevent premature component failure. Use the following table to help gauge your inspection frequency:
| Condition | Impact on Fluids | Recommended Action |
|---|---|---|
| Extreme Heat | Faster evaporation | Check monthly |
| Heavy Towing | Increased thermal stress | Check before/after trips |
| Dusty Roads | Contamination risk | Inspect filters and fluids |
How frequent short trips, towing, extreme temperatures, and dusty roads affect checks
Short trips prevent the engine from reaching optimal operating temperatures, which can lead to moisture buildup in your oil. Conversely, towing and driving in extreme heat place significant thermal stress on transmission and cooling systems. Regularly learning how to check car fluids in these specific conditions ensures that you catch contamination or degradation before it leads to costly repairs.
Conclusion
Regularly monitoring your vehicle ensures long-term reliability and safety on the road. Learning how to check car fluids empowers you to catch minor issues before they escalate into expensive repairs.
Consistent inspections of engine oil, coolant, brake fluid, and transmission fluid provide a clear picture of your car’s health. Always rely on manufacturer specifications and clear level markings to guide your maintenance decisions. Observing fluid color, texture, and potential leaks remains a vital part of your routine.
While home inspections offer great insight, some symptoms require expert attention. If you notice persistent warning lights, unusual odors, or significant fluid loss, consult a certified mechanic immediately. Professional service centers possess the diagnostic tools to address complex mechanical failures that go beyond basic fluid management.
Taking the time to understand how to check car fluids builds confidence and protects your investment. Keep your maintenance log updated to track trends over time. This proactive approach keeps your vehicle running smoothly for many miles to come.
FAQ
What is the most critical safety rule for learning how to check car fluids at home?
The most vital safety rule is to never open a hot radiator cap. Pressurized coolant can cause severe steam burns; therefore, you must only inspect the coolant reservoir or radiator when the engine is completely cool to the touch. Additionally, ensure the vehicle is parked on level ground with the parking brake engaged to get an accurate reading and prevent accidental movement.
How can I distinguish between normal engine oil and oil that indicates a mechanical problem?
Normal engine oil ranges from light amber to dark brown. However, if the oil on the dipstick appears milky or cloudy, it may indicate coolant contamination. If you notice metallic particles or a strong scent of gasoline, this suggests internal engine wear or fuel system issues. In these cases, topping off the oil is not enough, and you should seek a professional diagnostic from a certified ASE technician.
What is the difference between checking a dipstick-equipped transmission and a sealed system?
For vehicles with a transmission dipstick, you typically check the fluid while the engine is running and the fluid is at operating temperature. Conversely, many modern vehicles from brands like Ford, BMW, and Lexus feature sealed transmissions that do not have an accessible dipstick. These systems are designed for long-term use and should only be inspected by a professional if you experience slipping, grinding, or delayed shifting.
Why is my brake fluid low, and should I just fill it back up?
A low level in the brake fluid reservoir (located near the master cylinder) often corresponds to brake pad wear. As the pads thin, more fluid is held in the calipers. While you can top it off with the correct DOT 3 or DOT 4 fluid, a significantly low level may also indicate a hydraulic leak. If you notice a soft brake pedal or a dashboard warning light, have your braking system inspected immediately for safety.
Can I use tap water as a substitute for windshield washer fluid or engine coolant?
It is highly discouraged. Using water in the cooling system can lead to corrosion and scale buildup, whereas specialized coolants like Peak or Zerex provide essential anti-freeze and anti-boil protection. Similarly, tap water in the washer reservoir lacks the surfactants found in products like Rain-X and can freeze in the lines during winter, potentially cracking the reservoir.
Does every car have a power steering fluid reservoir to check?
No. While older vehicles and many heavy-duty trucks use hydraulic power steering systems with a dedicated reservoir and dipstick, many modern passenger cars have transitioned to Electric Power Steering (EPS). EPS systems do not use fluid, so if you cannot find a power steering reservoir, consult your owner’s manual to confirm if your vehicle is equipped with an electric motor instead.
How does a maintenance log help with long-term vehicle health?
A maintenance log allows you to track the rate of fluid consumption. If you record that you are adding a quart of oil every 500 miles, you can identify a developing leak or consumption issue before it leads to a total engine failure. This is especially important for vehicles subjected to severe driving conditions, such as frequent towing, dusty roads, or extreme temperature fluctuations.
What tools should I have on hand for a basic DIY fluid inspection?
To perform an accurate check, you should gather nitrile gloves, clean shop towels, a flashlight for dark engine corners, and a clean funnel to prevent spills. Most importantly, always have your owner’s manual nearby, as it contains the specific fluid types and capacities required by the manufacturer to avoid cross-contamination.